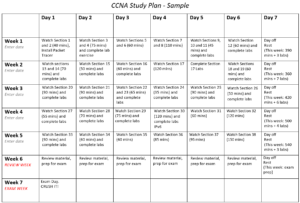
The first day back at work so not much as time to focus on learning CCNA commands so the goal this week is to follow the Study plan for week four which is 1 to 2 hours a night.  It will be a little tough but anything worthwhile is worth spending time on completing.


Section 27: Swtich Security

  • DHCP Snooping
    • Drops DHCP Server responses if they don’t arrive on a trusted port.
    • Command Example
      • (config)#ip dhcp snooping
      • (config)#IP dhcp snooping vlan 10
      • (config)#int f0/1
      • (config-if)#ip dhcp snooping trust
  • DAI: Dynamic ARP Inspection
    • Protect against Man in the Middle ARP Spoofing
    • Must have DHCP Snooping
      • The switch inspects the DHCP traqffic and keeps track of which IP addresses were assigned to which MAC addresses
    • If invalid ARP traffic tries to pass through the swtich, the switch drops the traffic.
    • Command example:
      • Trust ports that are not assigned through DHCP 
        • (config)#int f0/1
        • (config-if)#ip arp inspection trust
      • Enable ARP inspection at the VLAN level
        • (config)#ip arp inspection vlan 10
  • 802.1S Identity Based networking
    • Only authentication traffic is allowed on port, until host and user are authenticated
    • AFter a valid username and password are entered the switch port switches to a normal access port in the correct VLAN.
    • Steps taken in 802.1X
      • Supplicant (end user) sends username and password to Authenticator Switch
      • Authenticator Switch confirms the username and password with Authentication server
      • Port on the switch then transition the port to a regular switch port and allows the supplicant to transverse the network.
  • Preventing Unauthorised Device with Port Security
    • Shut Donw Unused Interfaces when not in use
      • (config)#int f0/2
      • (config-if)#shutdown
    • Port Security
      • Enable an admin to specify which MAC address or addresses can send traffic on a individual switch port.
      • This can be used to lock a port down to specific host(s)
      • You can specify a certain number of MACs to be able to connect to a port
      • You can set the port to learn MAC addresses automatically
      • MAC address can easily be spoofed, so this is used more for keeping from adding Wireless Access Points or other shared devices to the network on these protected ports
    • Command Example, this is set at the interface level
      •  This allows a single MAC address at a time but doesn’t specify or care what the MAC address is and devices can be swapped out allowing only one device at a time. If two MACs are connected the port will shutdown
      • Must be set on access ports
        • (config)#int f0/2
        • (config-if)#switchport port-security
    • Verification Commands
      • show port-security interface [interface]
    • Security Violation Actions – 3 options
      • Shutdown (Default):
        • Interface is placed into an error-disabled state
        • Will block traffic
        • Command – Restore an error-disabled interface back to service
          • Remove offending MAC address
          • Perform a shutdown and no shutdown command.
        • Command – Auto-Recovery, set at global level
          • (config)#errdisable recovery cause psecurity-violation
          • (config)#errdisable recovery interval 600
      • Protect:
        • Unauthorised address(es) traffice will be dropped.
        • Only authorised traffic will be forwarded
      • Restrict:
        • Same as Protected
        • Also Unauthorised addresses will be logged and the violation counter is incremented.
      • Command set at the interface level
        • (config)#int f0/2
        • (config-if)#swtichport-sectuity violation [protect | restrict]
    • Locking Ports to Hosts with Port Security
      • Maximum MAC Address
        • Default to 1 MAC address per port, this can be changed to whatever number needed
      • Example Command at interface level
        • (config)# interface f0/2
        • (config-if)#swtichport port-security maximum 2
      • Verification command
        • #show port-security int f0/2
    • manually adding MAC Addresses
      • Statically added MAC addresses to a specified port
      • Example Command – Set at the interface level
        • (config)#int f0/10
        • (config-if)#switchport port-security
        • (config-if)#switchport port-security mac-address [MAC address]
        • (config-if)#switchport port-security maximum 1
    • MAC Adress Learning
      • Used when you have a large number of ports that you need to be locked down and Manually configuring each port is not a scalable solution
      • Sticky MAC address add learned MAC addresses to the running-config (Save to startup-config to make permanent)
      • Example Command – Set at the interface level
        • (config)#interface f0/2
        • (config-if)#swtichport port-security
        • (config-if)#swtichport port-security mac-address sticky
      • Verification command
        • #show port-security address
          • Shows how the MAC addresses were assigned to the port [DyanmicConfigured | SecureConfigured]
          • Also shows how many MAC addresses have been assigned and how many MAX it can have.
        • #show port-security
          • Show a summary of the number of Max Secured addresses, Current address, Security Violation, and Security Action.

Took a couple of days off to get our house ready to sell.  I am hoping the brownie point that I earned from the with go a long way!

On section 23 of 39 but there are quite a few long sections coming up which make up about 50% of the estimated time of the course.  Slowly but surely I will get there!!


Section 23: DHCP – Dynamic Host Configuration Protocol

  • Beside forwarding DHCP requests, I am not really sure why this is even a section… Do people really use their routers as a DHCP server?
  • DHCP Server Configuration Commands
    • (config#ip dhcp excluded-addess [IP address start range] [IP address end]
    • (config)#ip dncp pool [text description]
    • (dhcp-config)#network [network address] [network subnet]
    • dhcp-config)#default-router 10.10.10.1
    • (dhcp-config)#dns-server 10.10.20.10
  • DHCP Server Verification Commands
    • show ip dhcp pool
      • Details fo the DHCP
    • show ip dhcp binding
      • DHCP client informaiton assignment
  • External DHCP Server
    • DHCP ip helper-address Commands, set on a interface hosting the subment.
      • (config)#interface f0/1
      • (config-if)#ip helper-address [DHCP IP address]
  • Cisco Router as a DHCP Client
    • Used in case that the router needs to pull IP address from ISP
    • Config commands
      • (config)#interface f0/0
      • (config-if)#ip address dhcp
      • (config-if)#no sutdown
    • Verification Commands
      • #show dhcp lease


Section 24: HSRP – Hot Standby Router Protocol

  • Backup routes will be given a higher AD (administration Distance) as this is backup and not load balancing
  • FHRP: First Hop Redundancy Protocols
    • Use VIP (Virtual IP) and MAC address to allow for automated gateway failover.
    • Devices use the VIP as the gateway
    • Protocols
      • HSRP – Hot Standby Router Protocol:
        • Cisco proprietary
        • Deployed in active/standby pair
        • Default is version 1
          • Version 2 introduces minor improvements
        • Both routers must be running the same version
      • VRRP – Virtual Router Redundancy Protocol
        • Open standard
        • Deployed in active/standby (Similar to HSRP)
      • GLBP – Gateway Load Balancing Protocol
        • Cisco proprietary
        • Supports active active load balancing acrossmultiple routers
  • Virtual IP and MAC addresses will be configured on the same interface on the routers that are used for standard traffic.
  • On device will be elected as the HSRP active router and the other will be come the standby reouter
  • The active router will respond to ARP requests and will own the virtual IP and MAC address
  • All traffic will go to the active router
  • If the standby router stops receiving hellos from the active router it will take on the responsibility of the IP and MAC addresses beconing the primary router.
  • The higher IP address with win election to be active if priority the same or left at default (100).  The higher priority will become active
  • If pre-emption is enable (disabled by default), when primary router comes back online the active router will be transfered back to the the higher priority router.
    • Leaving pre-emption disabled may be more stable in the case a router is flapping
  • Commands Example
    • First Router
      • (config)#interface g0/1
      • (config-if)#ip address 10.10.10.2 255.255.255.0
      • (config-if)#no shutdown
      • (config-if)#standby 1 ip 10.10.10.1
    • Second Rtouer
      • (config)#interface g0/1
      • (config-if)#ip address 10.10.10.3 255.255.255.0
      • (config-if)#no shutdown
      • (config-if)#standby 1 ip 10.10.10.1
  • Verification Command
    • #show standby
  • Priority, Pre-emption and version Commands examples
    • (config)#interdace g0/1
    • (config-if)#ip address 10.10.10.2 255.255.255.0
    • (config-if)#no shutdown
    • (config-if)#standby 1 ip 10.10.10.1
    • (config-if)#standby 1 pritory 110
    • (config-if)#standby 1 preempt
    • (config-if)#standby version 2
  • Active/Active
    • You can have an active/active HSRP for separate different IP subnets.  For the same IP subnet, it will be active/passive.


Section 25: STP – Spanning Tree Protocol

  • Layer 2 technology to avoid loop on layer 2 switches.
  • Used to prevent looping arp broadcast storms when requests between switches while attempting to populate the ARP table.
  • STP physically shuts down interfaces to prevent the broadcast storm. 
  • If the STP link goes down the switch will detect the outage and change a disabled port to an active forwarding port.
  • Switches sends BPDU (bride protocol data units) out all ports when they come online
    • Used to detect other switches and potential loops
  • A switch will not forward traffic out any port until it is certain it is loop-free.
    • Port starts in a ‘Blocking State’
    • Will detect if the port forms a potential loop
    • When determined no loop the port is changed to a ‘forwarding’ port
    • Can take up to 50 seconds
  • Bridge ID
    • BPDU contains Bride ID which identifies the switch
    • Bridge ID is made up of the switch’s unique MAC and a defined Bridge Priority value
      • The bridge priority is a number from 0-65535, but is defaulted to 32768
  • Root Bridge
    • Elected based on the switches’ Bride ID values
    • The Switch with the lowest Priority value is preferred
    • When the priority is the same the switch with the lowest MAC address will win the election
    • The switches build a loop-free forwarding path Tree leading back to the Root Bridge
  • Spanning Tree Cost
    • Switch calculates its best path towards the Root bridge
    • Higher bandwidth links are preferred
    • Date Rate – STP Cost
      • 4 Mbps – 5,000,000
      • 10 Mbps – 2,000,000
      • 16 Mbps – 1,250,000
      • 100 Mbps – 200,000
      • 1 Gbps – 20,000
      • 2 Gbps – 10,000
      • 10 Gbps – 2,000
  • Load Balancing
    • STP instance does not load balance
    • If a switch has multiple equal-cost paths, it will select eh neighbor with lowest Bridge ID
    • If the requesting switch has multiple paths to the same neighbor (two ethernet connection to the same switch) it will select the port with the lowest Port ID
  • Designated Ports
    • These are ports coming from the root switch
      • Root Ports point toward the Root Bridge
      • Designated Ports point away from the Root Bridge.
      • All ports on the Root Bridge are always Designated ports
    • Designated ports can exist on switches that are not the Root Bridge Switch, in these cases, they will be switches that are between the requesting switch and the Root Bridge Switch.
      • Root and Designated ports are the most direct paths to and from the root bridge.
      • Designated ports are also the lowest cost Bridge ID on links that have been blocked because the are not the most direct paths.
  • Blocking Ports
    • Any ports which have not be selected as a Root Port or Designated Port Pair and would be a potential loop
    • BPDUs continue to be sent over the link but other traffic is dropped
    • STP only blocks ports on one side of the the link
  • 7-Steps to determine port types
    • Determine the Root Bridge
      • Lowest Priority and in case of a tie, the lowest MAC
    • All ports on the Root Bridge are Designated Ports
    • Determine the Root Ports on the other switches
      • Lowest cost to root port based on link cost (lowest wins)
    • Ports on the other side of the Root Ports are Designated ports
    • On links that are not determined Root or Designated ports, will be determined as Blocking ports
      • Determined the block port by highest cost path to root bridge or highest bridge ID
    • The port on the other side of the blocking port is Designated Ports.
  • Spanning Tree Versions
    • IEEE Open Standards
      • STP – 802.1D Spanning Tree Protocol
        • Uses one Spanning Tree for all VLANs in the LAN
      • RSTP – 802.1w Rapid Spanning Tree Protocol
        • Imporved convergence time
      • MSTP – 802.1s Multiple Spanning Tree Protocol
        • Enables grouping and mapping VLANs into different spanning-tree instances for load balancing.
    • Cisco Proprietary versions
      • PVST+ – Per VLAN Sapnning Tree Plus
        • Enhancement to 802.1D
        • uses a separate Spanning Tree instance for every VLAN
        • Default on Cisco Switches
      • RPVST+ – Rapid Per VLAN Spanning Tree Plus
        • Enhancement to 802.1w TSPT
        • Improved Convergence time over PVST+
        • Uses a separate Spanning Tree instance for every VLAN
      • Cisco versions do not support grouping multiple VLANs into the same instance, so you must configure each VLAN separately.
  • Verification of STP
    • Verification Commands
      • show spanning-tree vlan
        • Include VLAN# at the the end of the command to look at a single VLAN:
          • Example: show spanning-tree vlan 1
      • show mac address-table
        • Use this to determine the path of traffic
  • Manipulate the Root Bridge Election
    • Reasons to manipulate the Root Bridge
      • Root bridge acts as ta center point of the LAN
      • Ensure a pair of high-end core switches are selected as 1st and 2nd most preferred Root bridge
      • Lowest MAC address has the chance of being the oldest switch on the network, so make sure that the oldest switch is not the root bridge may want to be reviewed.
    • Command
      • (config)#spanning-tree vlan 1 root primary
        • Set the switch to be the primary switch to STP
        • Set priority of 24576
      • (config)#spanning-tree vlan 1 root secondary
        • set the switch to be the secondary switch for STP
        • Set priority of 28672
  • STP and HSRP Alignment
    • HSRP should be configured to match the STP path
    • Ensure that VLAN HSRP and Root Bridge match accordingly.
  • Portfast, BPDU Guard and Root Guard
    • STP Portfast
      • On ports that have a single host, you can turn off STP so the convergence time can be avoided and have the port come up ASAP as opposed to the 50 second wait time.
      • Command Examples
        • Set a single port for portfast 
          • (config)# interface f0/10
          • config-if# spanning-tree portfast
        • Set all port to a default of portfast on
          • (config)# spanning-tree portfast default
        • If a ‘portfast default’ is configured and a switch is configured using the following example to remove portfast on the interface
          • (config)# interface f0/1
          • (config-if)# no spanning-tree portfast
    • BPDU Guard
      • Enable BPDU Guard on Portfast ports to guard against un-authorized switches being added.
      • This will shutdown the port if a switch is detected.
      • Command Example
        • Turn on BPDU guard on a single port 
          • (config)#int f0/10
          • (config-if)#spanning-tree portfast
          • (config-if)#spanning-tree bpduguard enable
        • Set all ports as BPDU default on all ports
          • (config)#spanning-tree portfast bpduguard default
    • STP Root Guard
      • Prevents an unintended switch from becoming the root bridge
      • If the interface receives a superior BPDU it will transition the port to root-inconsistent, it will not forward any traffic over the port and in sense shut the port down
      • Set on ports that would not expect a higher priority, and protect from an un-authorized switch trying to take priority of STP root.
      • Command
        • (config)#int fa0/2
        • (config-if)#spanning-tree guard root


Section 26: EtherChannel

  • Oversubscription
    • Recommendation for oversubscription is 20:1 from the access layer to the distribution layer
      • 20 PCs connect with 1 Gbps NICs at the access layer, you would require 1Gbps uplink to the distribution layer
    • 4:1 ratio is recommended from the distribution layer to the core layer
    • These are general rules and should be analyzed on each network and configured as necessary
    • Example
      • 48 port 1Gbps switch with a pair of 10GBps
      • subscription ratio = 2.4:1
        • 48/20=2.4
      • STP cause a problem as it by defaults disables a single port providing a with on one link and a ratio of 4.8
  • Etherchannel (AKA Port Channel, LAG Link Aggregation, Link bundle)
    • Groups multiple physical interfaces into a single logical interface
    • STP see the EtherChannel as a single interface, providing all bandwidth
    • Traffic is load-balanced across all the links in the EtherChannel
    • If the interface goes down all remaining links will remain up.
    • NIC Teaming
      • AKA – Bonding, NIC balancing, Link aggregation
  • EtherChannel Load Balancing
    • Packet in a single session all go over the same port-channel/link
      • If packets were round robined it could cause packets being delivered out of order.
      • This means that each session is only allowed 1 gig but there are multiple links for additional connections.
  • EtherChannel Protocols and Configuration
    • LACP – Link Aggregation Control Protocol
      • Open standard
      • Switches on both sides negotiate the port-channel creation and maintenance
      • Most widely used
      • Configuration
        • Can be set as either Active or Passive
        • If both interfaces set to passive the channel will not come up
        • Recommended that both sides are set to Active, that way you do not have to worry about which side is active and which is passive.
      • Commands
        • This creates interface port-channel 1
          • (config)#int range f0/23 – 24
          • (config-if-range)#channel-group 1 mode active
        • Configure the interface setting on the port channel, this is where you would set all other settings such as VLANs, IP, etc…
          • (config)#interface port-channel 1
          • (config-if)#switchport mode trunk
    • PAgP – Port Aggregation Protocol
      • Cisco proprietary
      • Switches on both sides negotiate the port-channel creation and maintenance
      • Interfaces can be set to desirable or auto
        • Will not come up if both are set ‘Auto’ it will not come up
        • Recommended that both sides be set as ‘desirable’
      • Command Example
        • Create PAgP port channel 
          • (config)#interface range f0/23 – 24
          • (config-if-range)#channel-group 1 mode desireable
        • Configure port channel, this is where you would set all other settings 
          • (config)#int port-channel 1
          • (config-if)#switchport mode trunk
    • Static EtherChannel
      • Switches do not negotiate the creation and maintenance
      • Settings must match on both sides for the port channel to work
      • Use is LACP is not supported on both sides
      • Command Example
        • Create port channel 
          • (config)#interface range f0/23 – 24
          • (config-if-range)#channel-group 1 mode on
        • Configure port channel, this is where you would set all other settings 
          • (config)#int port-channel 1
          • (config-if)#switchport mode trunk
    • Command
      • Verification
        • #show etherchannel summary
        • #show spanning-tree vlan 1
    • Parameters
      • Both sides must have matching configs
        • Speed and duplex
        • Access or Trunk mode
        • Native VLAN and allowed VLANs on trunks
        • Access VLAN on access ports
    • StackWise, VSS, and vPC
      • When you have two port-channels set up going between two different switches, spanning tree sees this as two different paths and will shut one of the port-channels down to protect against loops.
      • Multi-chassis EtherChannel
        • Support a shared EtherChannel from different switches
        • Supported on some switches (must be advance level switches that support Multi-chassis EtherChannel)
        • STP see a single link from switch that is connected to the two core switches and on those two switches it see a single channel that is shared on two switches.
        • The switch that supports Multi-chassis EtherChannel will have one of the following three
          • StackWise
            • Catalyst switch families 3750, 2850 and 9000 
          • VSS
            • Catalyst switch families 4500 and 6500 
          • vPC
            • Nexus switch family
    • Layer 3 EtherChannel
      • Command examples
        • (config)#interface range GigabitEthernet 1/0/1 – 2
        • (config-if-range)#no switchport
        • (config-if0range)#channel-group 1 [mode | active | auto |desireable | on | passive]
        • (config)#interface port-channel 1
        • (config-if)#ip address [ip address] [subnet]
        • (config-if)#no shutdown
      • This is used more no days as layer 3 switches were much more expensive in the past
      • Same as layer two as far as configuration and fast convergence times
      • Using layer 3 EtherChannel will affect the end-users default gateway to be the port on the switch since each link between the switches will be a different IP address range.


I was hoping to more than halfway done at this point, but there is a lot to learn and the labs are taking a little longer than I was hoping, but this is a good thing as the more I use the commands the better off I will be for the test and plus this will all be a reference for future review when I can’t remember commands 🙂

Section 20: OSPF – Open Shortest Path First

  • OSPF Adjacencies
    • Focus on the first three steps in the OSPF Operations
      • OSPF Operations Review
        • Discover neighbors
        • Form adjacencies
        • Flood LSDB (Link State Database)
        • Compute the shortest path
        • Install best routes in the routing table
        • Respond to network changes
      • OSPF Packet Types Review
        • Hello – Used to find adjacent routers
        • DBD (DataBase Description) packets – Used for adjacent routers to tell each other the networks they know about.
        • LSR Link State Request – Used to populated missing info in the received DBD
        • LSA (Link State Advertisement) – Route Update
        • LSU (Link State Update) – List of LSA’s which should be updated, used during flooding
        • LSAck – LSA acknowledgment
    • Hello Packets
      • OSPF routers discover each other and form adjacencies via Hello packets
      • Hello packets our sent out non-passive OSPF enabled interfaces.
      • Multicast on 224.0.0.5 every 10 seconds
      • Hello Packet Contents
        • Router ID
        • Hello Interval – Default 10 seconds
        • Dead Interval – Default 4x Hello Interval
        • Neighbors – list of adjacent OSPF routers that it has received Hello packets from
        • Area ID – 
        • Router Priority – 8 bit number used to select DR (Designated Router) and BDR (Backup Designated Router)
        • DR and BDR IPv4 Address – If known
        • Authentication Flag – Auth details
        • Stub Area Flag – uses ABR to connect two OSPF areas
      • Routers must match for adjacency
        • Must be each other’s Neighbor list
        • Following must match
          • Hello and Dead Intervals
          • Area IDs
          • IP Subnet 
          • Auth Flag
          • Stub Area Flag
    • OSPF DR and BDR Designated Routers
      • When there are multiple routers in a multiaccess segment/subnet it is not effective for the routers to create a 1 to 1 link between each router to pass information.
      • DR (Designated Router)
        • Will control all replication for all routers on the segment
      • BDR (Backup Designated Router)
        • In place, if the DR goes down
      • The DR and BDR are elected
        • Router with the highest priority (0-255) becomes DR and the second-highest priority becomes BDR with the highest Router ID breaking a tie.  Priority is set manually if not left at default which is 1.
          • Set Priority to zero if you wish the router to not become a DR or BDR
        • Ethernet interfaces will be considered a multiaccess segment and a DR/BDR will be designated, but serial connections are point to point and no DR/BDR will be advertised/elected.
      • OSPF Priority Command
        • (config#interface [interface]
        • (config-if)#ip ospf priority [0-255]
          • OSPF restart on the interface for change to take place
            • Restart router
            • Disable/Enable interface
            • Clear OSPF
              • command: #clear ip ospf process
              • This does not cause a full election and the BDR will remain the same and the command would need to be restarted on the old BDR or the old DR for the BDR to change.
      • In the case of four routers on a segment, the DR and BDR will be in a full state communication with all the routers to pass information, the two routers that are not a DR or BDR, they will reside in a 2-way state to ensure each other are up and running but will not passing routing information.
        • If there is a link-state change an LSU packet is sent multicast over 224.0.0.6 to all designated routers
        • DR will multicast the update on 224.0.0.5 to all OSPF routers
    • OSPF Areas
      • Potential issues
        • Too many routes can use up to much memory
        • Network changes on large networks can take a long time to reconverge and use a lot of CPU resources
      • Resolution for large networks
        • OSPF supports a hierarchical design, large networks into smaller areas
          • Transit area (backbone/area 0), generally does not contain users
          • Regular areas connect end-users to the transit area to connect to other areas
        • Routers maintains full info about its own area and summary info about other areas
      • Router types
        • Backbone contains all routes for area 0
        • ABR (Area Border Router) and contains multiple areas
          • Separates LSA flooding zones
          • Summarizes area address
          • Source for default routes
          • Maintains the LSDB for each area that is it connected to
          • Recommended that it is only connected to two areas
          • Summarisation is not automatic and needs to be configured manually
            • (config-router)#area [area id] range [network address] [subnet]
      • Summary routes will show in the ‘#show ip route’ as ‘O IA’ which is OSPF inter area
      • ASBR (Autonomous System Boundry Router)
        • it is running OSPF but it is providing routes from another source
          • Example: RIP, EIGRP or static routes being distributed from another source
          • From “#show ip route’ it will show up as O*E1 or O*E2 route


Section 21: VLANs Virtual Local Area Networks

  • VLAN
    • Operate at Layer 3
    • Separate IP subnets and need a router to be able to communicate.
    • Provide performance and security by splitting networks into smaller domains
    • Layer 2 Switches broadcast traffic everywhere including between different IP subnets
  • VLAN Access Ports
    • Where end hosts are plugged in.
    • Have one VLAN
    • end host is not VLAN aware
  • VLAN commands
    • Create VLAN
      • (config)#vlan [vlan#]
      • (config-vlan)#name [text]
    • Assign interface to VLAN
      • (config)#interface [interface] – Single interface
        • For multiple interfaces: (config)#interface range [interface range]
      • (config-if)#switchport mode access
      • (config-if)#switchport access vlan [vlan#]
    • Trunk Ports
      • Dot1Q Trunk Port
        • Tags layer 2 Dot1Q header with correct VLAN
        • Receiving switch only forwards traffic out to requested VLAN ports
        • Dot1Q tad is removed from frame when it sends to the end host
      • Trunk Commands
        • (config)#interface [interface]
        • (config-interface)#description [text]
        • (config-interface)#switchport trunk encapsulation dot1q
        • (config-interface)#switchport mode trunk
      • Access Trunk Port
        • (config)#interface [interface]
        • (config-interface)#description [text]
        • (config-interface)#switchport mode access
        • (config-interface)#switchport access vlan 10
        • (config-interface)#switchport voice vlan 20
      • Native VLAN
        • Switch needs to know which VLAN to assign to any traffic which is untagged on a trunk port
        • Default VLAN is VLAN 1
          • It is recommended to change to a different VLAN then VLAN 1 for security concerns.
        • native VLAN must match on both sides of a trunk for it to come up
        • Native VLAN Configuration Command
          • Create VLAN
            • (config)#vlan [vlan#]
            • (config-vlan)#name [test description: Native]
          • Configure Trunk Port
            • (config)#interface [interface]
            • (config-interface)#description [text]
            • (config-interface)#switchport trunk encapsulation dot1q
            • (config-interface)#switchport mode trunk
            • (config-interface)#switchport trunk native vlan 199
        • Allow VLAN over Trunk
          • (config)# interface [interface]
          • (config-interface)#switchport trunk allowed vlan [vlan#s separated by a comma]
      • DTP Dynamic Trunking Protocol
        • It is recommended not to use DTP and to manually configure the access and trunk ports
        • DTP configuration commands
          • #Switchport mode dynamic auto
            • Will form a trunk if the neighbor switch port is set to trunk or desirable.
          • #Switchport mode dynamic desirable
            • Will form a trunk if the neighbor switch port is set to trunk, desirable or auto
          • #Switchport nonegotiate
            • disables DTP
      • VTP VLAN Trunking Protocol
        • Allows you to add, edit or delete VLANs on switches configured as VTP server
        • Switches configured as VTP clients synchronize their VLAN database with VTP servers
        • Good for large campus
        • If switch with a hight VLAN database revision number in the domain it can wipe out all your production VLANs
        • VTP domain name has to match on neighbor switches for DTP trunks to be formed.
        • VTP Modes
          • VTP Server
            • Can add, edit or delete VLANs
            • Sync VLAN database from another server with a higher revision number
          • VTP Client
            • Cannot add, edit or delete VLANs
            • Sync VLAN database from the server with the highest revision number
          • VTP Transparent
            • Does not participate in the VTP domain
            • Can add, edit or delete VLANs in its own local VLAN database
        • VTP Commands
          • Create a VTP domain
            • (config)#vtp domain [Domain name]
          • Assign device VTP mode
            • Server
              • (config)#vtp mode server
            • Client
              • (config#vtp mode client
            • Transpaent
              • (config)#vtp mode transparent
          • Verification
            • #show vtp status


Section 22: Inter-VLAN Routing

  • Router with separate Interfaces
    • Config like it is a regular setup, no special setup.
  • Router on a Stick
    • Create a sub interface on the router and use the same setting as a physical interface
    • Commands
      • Enable router the interface that will be used
        • (config)#interface [interface: example: f0/1]
        • (config-interface)#no ip address
        • (config-interface)#no shutdown
      • Create VLAN interface
        • (config)#interface [interface: example: f0/1.10]
        • (config)#encapsulation dot1q 10
        • (config-interface)#ip address [ip address] [subnet]
        • (config)#interface [interface: example: f0/1.10]
        • (config)#encapsulation dot1q 20
        • (config-interface)#ip address [ip address] [subnet]
      • Set switch trunk
        • (config)#interface [interface]
        • (config-if)#switchport mode trunk
  • Layer 3 Switch
    • Use SVI (Switched Virtual Interfaces) for the gateways interfaces
    • Inter-VLAN Routing Configuration Commands
      • (config)#ip routing
      • (config)#interface vlan [vlan1#]
      • (config-if)#ip address [gateway ip address] [gateway subnet]
      • (config)#interface vlan [vlan2#]
      • (config-if)#ip address [gateway ip address] [gateway subnet]
    • WAN Routing Configuration
      • Switch Example
        • (config)#interface F0/1
        • (config-if)#no switchport
        • (config-if#ip address 10.10.100.1 255.255.255.0
        • (config)#ip route 0.0.0.0 0.0.0.0 10.10.100.2
      • Router
        • (config)#interface f0/1
        • (config-interface)#ip address 10.10.100.2 255.255.255.0
        • (config)#interface f0/2
        • (config-interface)#ip address 203.0.113.1 255.255.255.0
        • (config)#ip route 0.0.0.0 0.0.0.0 203.0.113.2
        • (config)#ip route 10.10.0.0 255.255.0.0.10.10.100.1


And the fun continues as I continue to prep for my CCNA certificate.

Lab 17 – So many commands that but by the end I think that I got them all

  • #show ip route
  • #show ip protocols
  • #show ip rip database
  • #show eigrp neighbor
  • debug [protocol]
  • (config)# router [protocol] {number for eigrp and OSPF which I have not learned about yet}
    • (config-router)# network [IP] [subnet | reverse subnet] {area for OSPF}
    • (config-router)# no auto-summary — This is for testing purposes
  • ip route with AD setting for fall back route

After writing them down, there aren’t that many but it sure felt like it when using all of the different protocols and how the AD (Administrative Distance) prioritizes one protocol over another.


Section 18 Connectivity Troubleshooting

  • Extended ping – very nice tool that I was not aware of.
    • Enter “ping” without an address will bring up other options such as
      • Protocol [ip]
      • Target IP address
      • Repeat count [5]
      • Datagram size [100]
      • Timeout in seconds [2]
      • Extended commands [n]
        • Source address or interface
        • Type of service [0]
        • Set DF bit in IP header [no]
        • Validate reply data [no]
        • Data pattern [0xABCD]
        • Loose, Strict, Record Timestamp, Verbose [none]
        • Sweep range of sizes [n]
  • Extended Traceroute – started the same way but due to the difference in functionality the options differ
    • Protocol [ip]
    • Target IP address
    • Source address
    • Numeric display [n]
    • Timeout in seconds [3]
    • Prove count [3]
    • Minimum Time to Live [1]
    • Maximum Time to Live [30]

Section 18 Lab – Use ping and traceroute to discover which router is missing a static route


Section 19 IGP Interior Gateway Protocol Fundamentals

  • RIP
    • Distance Vector
    • Hop Count Metric
    • Max hop count is 15
    • Summarise routes to the classful boundary by default
      • This can cause issues so it is recommended to use the “no auto-summary” to ensure that routes are not changed in undesirable ways.  If left on making sure that the routes are confirmed correct.
      • Use “ip summary-address rip” to manually summarize route at the interface level
    • Perform ECMP (Equal Cost Multi Path)
      • 4 paths by default
        • Can it have more and can it be set to less?
    • Version
      • Version 1
        • Not usually used much as version 2 has many advantages
        • Uses Broadcast every 30 seconds
        • Does not support authentication
        • Does not support Variable Length Subnet Masking (VLSM)
      • Version 2
        • Use multicast address 224.0.0.9 instead of broadcast
        • Supports authentication
    • RIPng
      • Not covered but should know that it is for IPv6
    • Verification commands
      • #show ip protocols
      • #show run | section rip
      • #show ip route
      • #sho ip rip database
    • Default Route Injection
      • (config-router)# default-information originate
  • EIGRP (Enhanced Interior Gateway Routing Protocol)
    • Advanced Distance Vector routing protocol
    • Very fast convergence time
    • Multicast – sent to routers affected by the changes through bounded updates
    • ECMP 4 paths by default but can be increased to 16
    • Can perform unequal cost load balancing
    • Autonomous System (AS) Number
      • This is to enforce independent administrative domains, each router much have the same AS number to pass routing information but this allows separate administrative domains.
    • Use a wild card mask when specifying the subnet
      • If no subnet mask is specified a classful boundary will be used. Class A 0.255.255.255, B 0.0.255.255 or C 0.0.0.255 will be used.
    • The interface subnet is what will be advertised and not the network that was setup.
      • Example
        • EIGRP used network 10.0.0.0 does not share 10.0.0.0/8 but will share any interfaces that are shared in the 10.0.0.0/8 range.  So interface with IP range of 10.10.0.0/24 will be shared.
    • Router identify themselves with an EIGRP Router ID which is a form of an IP address
      • Being the highest IP address of any loopback interface or highest other IP address if no loopback exists.
      • You can manually specify the Router ID
      • Recommended to use Loopback or manually set the routed ID
        • Manual ID command: (config-router)#eigrp router-id [ID]
    • Commands
      • #show run | section eigrp
      • #show ip protocols
      • #show ip eigrp interfaces
      • #show ip eigrp neighbors
      • #show ip route


Section 20: OSPF – Open Shortest Path First

  • Link State routing protocol
    • Each router describes itself and its interfaces to its direct neighbors
    • Each router learns the full network
  • Used for large networks
  • Fast convergence time
  • Multicast
  • Open standard so used by most vendors, for this reason, it is the most common internal routing protocol used.
  • Uses Dijkstra’s Shortest path algorithm to learn the network.
  • OSPF uses LSA (Link State Advertisements) to pass on the routing updates
  • OSPF Router ID
    • Being the highest IP address of any loopback interface or highest other IP address if no loopback exists.
    • You can manually specify the Router ID
    • To change the Router ID the service will need to be restarted
    • Recommended to use Loopback or manually set the routed ID
      • Manual ID command:
        • (config)#router ospf [process ID]
        • (config-router)#router-id [ID]
  • Uses a wild card mask when specifying the subnet
    • A wild card mask has to be specified or it will error upon entry
  • OSPF Operations
    • Discover neighbors
    • Form adjacencies
    • Flood LSDB (Link State Database)
    • Compute the shortest path
    • Install best routes in the routing table
    • Respond to network changes
  • OSPF Packet Types
    • Hello – Used to find adjacent routers
    • DBD (DataBase Description) packets – Used for adjacent routers to tell each other the networks they know about.
    • LSR Link State Request – Used to populated missing info in the received DBD
    • LSA (Link State Advertisement) – Route Update
    • LSU (Link State Update) – List of LSA’s which should be updated, used during flooding
    • LSAck – LSA acknowledgment
  • OSPF commands
    • (config)#router ospf [Process ID]
      • Process ID does not have to match to work with the neighboring routers
      • Routes will however not be propagated to other routers in the network since the process ID does not match.
    • (config-router)#network [network ip] [subnet wildcard mask] [area]
      • Example
        • OSPF used network 10.0.0.0 does not share 10.0.0.0/8 but will share any interfaces that fall into the 10.0.0.0/8 range.  An example: interfaces with IP range of 10.10.0.0/24 will be shared.
    • #sh run | section ospf
      • show ospf in the running-config
    • Identification and troubleshooting commands
      • #show ip protocols
      • #show ip ospf interface brief
      • #show ip ospf neighbor
      • #show ip ospf database
      • #show ip route
    • Manual ID command:
      • (config)#router ospf [process ID]
      • (config-router)#router-id [ID]
    • Passive Interfaces
      • (config)#router ospf [process ID]
      • (config-router)#passive-interface [interface]
      • (config-router)#passive-interface [interface]
      • (config-router)#passive-interface default
        • set all interfaces to passive
      • (config-router)#no passive-interface [interface]
        • Turns on the interface to use OSPF
    • Default Route Injection
      • (config)#ip route 0.0.0.0 0.0.0.0 [gateway IP]
      • (config)#router ospf [process ID]
      • (config-router)#default-information originate
    • Bandwidth vs Clock Rate and Speed
      • Speed Command
        • Used for network interfaces 
        • if ‘speed 10’ is set it will only transmit at 10 Mbps
      • Clock rate command
        • Used for Serial interfaces physical transmit
        • Serial interfaces transmit at 1.544 Mbps by default
        • If ‘clock rate 64000’ is set if will physically transmit at 64 Kbps
      • Bandwidth command
        • Setting ‘bandwidth’ does not affect the physical transmission rate.
        • If you set the bandwidth to 50 Mbps on a FastEthernet interface, it will still transmit at the default 100 Mbps or the set ‘speed’
        • ‘Bandwidth’ command affects software policy on the router
          • EIGRP
          • OSPF
          • QoS
        • It can influence software policy by setting the bandwidth on an interface.
    • OSPF Cost Metric
      • The router will learn about all destinations in its area and select routes based on its lowest to get to the destination.
      • Reference Bandwidth
        • Cost is automatically derived from the interface bandwidth.
          • Cost = Reference Bandwidth/Interface Bandwidth
            • Default reference bandwidth is 100 Mbps
            • FastEthernet link cost defaults to 1 (100/100)
            • t1 link cost defaults to 64 (100/1.544)
          • The reference bandwidth should be changed on all routers to compensate for speeds faster than FastEthernet otherwise all interfaces will be seen as a cost of 1
            • (config) #router ospf 1
            • (config-router)#auto-cost reference-bandwidth 100000
      • Manipulating the OSPF Metic
        • If manipulation is needed it is recommended to change OSPF cost on interfaces opposed to bandwidth as changing bandwidth can affect features other than OSPF such as QoS.
        • Cost change commands
          • (config)#interface [interface]
          • (config-if)#ip ospf cost 50
        • To review OSPF cost commands
          • #show ip ospf interface
            • To see full details for all interfaces
          • #show ip ospf interface [interface]
            • To see an individual interface
          • #show ip ospf interface brief
            • To see a summary of all interfaces

Another day in the book.  I am on week three but I have a feeling since I am not just reviewing OSI model items and now focusing on Cisco commands along with the Cisco Functionality I will be working more closely with the timeline that is laid out on the study plan calender.


So I am on vacation and while most people go out and see new sites or at least get out of the house, I am working on getting through as much as the CCNA training that I can before going back to the day job, so without further ado…

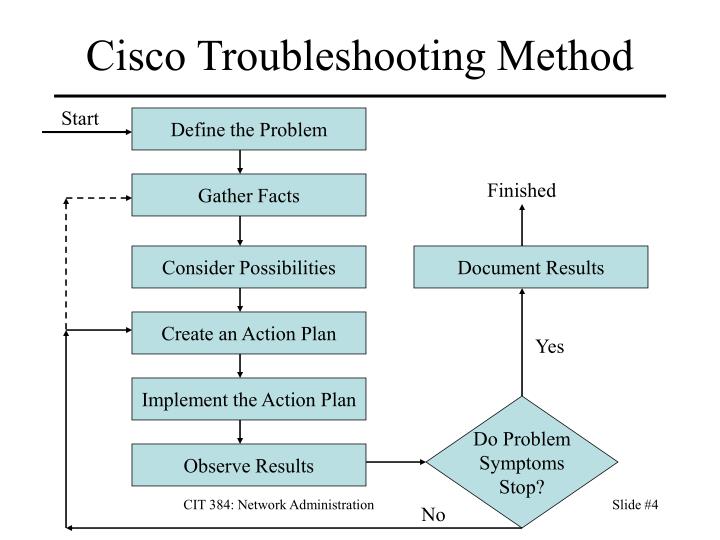
13. The Cisco Troubleshooting Methodology – Who knew that I was doing this without knowing the Cisco Methodology

Something fun to know, if you need end a traceroute in Cisco Packet Tracer is the command ctrl+Shift+6, I found this in the lab but when it was being demoed I kind of fix it before the getting to the lab or even through the lab demo.

14. Cisco Router and Switch Basics – Lots of talk of the setup wizard, “Shutdown”, “No shutdown”, full and half-duplex troubleshooting.  As well as CDP and LLDP.

15. Cisco Device Management – Boot up, Factory Reset, backup, and upgrades.

16. Routing Fundamentals – Lots of routes and how to set them along with a lot of labs to watch.

17. Dynamic Routing Protocols – The section that I really start learning/reviewing items that I haven’t used before.  I was somewhat familiar with RIP, EIGRP, and OSPF, but not IS-IS, loopbacks, or passive interfaces.

Looking at the schedule that came with the course, I didn’t quite finish week 2 on day two as I still need to complete the lab for section 17 and do all of 18 and 19 with their labs.  Will I be ready to take the test on Friday before I head back to work a week from tomorrow?


I have decided that I needed to get another piece of paper to continue on proving myself to the unknown masses of tomorrow.

I feel that with my experience that the CCNA test is something that I should be able to tackle in a fair amount of time since my daily workday is full of Wireshark captures and troubleshooting network issues of the customer.

It has been some time since I have logged into a Cisco device as recent jobs have had me working a Fortinet Firewalls and switches as well as Symantec Proxy, Content Analysis, Management Center and Reporter devices.  The Symantec devices at least retain many of the Cisco formats with the enable, config t type layout.

I first looked through the LinkedIn Learning library as that is something that is offered through my current employment but the only CCNA course that I saw was the CCNA security lesson.  I am sure that will be great but wanting to make sure that I have all my bases covered before I drop $300 on a test I went over to Udemy and decided to go with Neil Anderson @flackboxtv and his Cisco CCNA 200-301 – The Complete Guide to Getting Certified.

I appreciate that he has a Study plan setup and there is some solid steps laid out to follow, as I am one of those set path types of guys.

Now granted I did do the first weeks of lessons on day 1 as there was little that was new to me here as the OSI model is something that I was studying back in 1999 (man I am old, lol)

I think the only thing that might have made this a little better is if he explained some of the network details with Packet Capture program like Wireshark.

Here is a review of the sections in the course:

  1. Welcome – Discuss how and why he has set up the program in the layout he has.
  2. How to set up the Lab – Cisco Packet Tracer setup.  It has been quite a while since I have used this but it is a great free tool to learn the Cisco devices
  3. Host to host communications – A high level overview of the OSI model, a bit boring for veterans but good review and some new acronyms that I hadn’t heard before… Please Do Not Take Sales People’s Advice – Please Do Not Touch Superman’s Private Area
  4. The Cisco IOS Operating System – Summary of the structure and review of the different OSs from the past and current.
  5. OSI Layer 4 Summary
  6. OSI Layer 3 Summary
  7. IP Address Classes
  8. Subnetting – I haven’t had to do this manually for so long, I didn’t realize how rusty I was.  I will say I appreciate a good IP calculator
  9. OSI Layer 2 Summary
  10. OSI Layer 1 Summary
  11. Cisco Device Function – Switches, Hubs, and Routers oh my…
  12. The Life of a Packet – I will say the last two parts were overkill.  If you don’t understand ARP after this you either don’t want to or you should be looking at a different profession.

Bring on Week/Day 2!!

Life is a funny thing and many times it is cloudy and mysterious.  2020 has been a mix of ups and downs but mostly downs.

The one thing that I have always said…

“Control what you can control, and attempt to use what you are given.”

In 2019 I found myself looking for a new position after my previous employer decided that the 80 hour weeks for 3 months straight was not what they wanted from a salaried employee and we separated ways which was the best thing for my health and for my family to remember who I was.

There were some doubts in my head about how good I was at my job and what was the next step in my 19 years in the IT field, but I decided that working for small to mid-size companies may not be the best thing and I decided to take my talents to a larger worldwide company that a friend worked for.

It was stated that their pay started low which I know that I could prove myself and increases would not be an issue as I would make sure that I would meet and surpass the expectations of my manager.  So I accepted a pay cut because I could see this is a job that I could retire at, with plenty of room to grow…

The funny thing about larger companies is that there is less control over when raises can be given even if you meet and surpass the expectations of your manager and of the company.

After about 5 months there was an announcement that the company was being purchased.  I knew it was a long shot but I talked to my manager and talked to him about potentially getting an increase before the buy-out because after there would probably be a freeze and increases that are supposed to happen after 6 and a year were not likely to happen.

It was nice to hear my manager say that I was one of a few that he would go to bat for because after not even 6 months I have proven a valuable team member, the 16 months onboarding process I had almost completed in the 5 months, and I was much more valuable than what I was being paid.  There might have even been mention that if I would have countered the initial salary that I could have received more, and that he would never underpay a new employee again.  Alas, a week later my first manager with the company was now my old manager and the purchase of the company brought on manager number 2.

So learning what a manager wants from someone that reports to him is so different in so many ways.  Manager 1 was very interactive and was always trying to improve the process of the company and very closely involved with what was going on whether it be a single case or an overall issue with the company process.

Manager 2 was quite a different sort, he was more of the type of your job is to figure it out on your own and if you are stuck then let me know, but don’t come to me unless you are stuck.  This was quite different from manager 1 who was all about clearing your roadblocks so you can focus on completing your job, as opposed to you are completely in control of fixing your own issue.  Neither style of management quite different and neither one incorrect.

After coming up to the 1 year anniversary of my official hire date with company 1(6 months with company 2 and proving myself to manager 2 I started talking about a potential increase, which was also brought up with his manager.  Again it was said that they would do everything that could be done to get an increase if possible.

At this point I have proven myself valuable to the company, in fact, I have been kept on while there are many people that have been with company for years have been given severance packages.  After working with customers from all over the world and some of the top companies in the world any doubt that I had that working for a small and medium-sized company has kept me from growing have far vanished.  The confidence that I have gained from working with people has proven to me that not only have I kept up but I also have outpaced many in the field.

Enter manager #3… In just a year I have had 3 managers, the company buyouts are quite tough with people losing their position and/or jobs altogether but as for me, I continue on with my 3rd manager and on top of that Covid.  The world has been turned upside down and the announcement has come down that with prepping for a downturn in business that there will be no wage increases for 2020 but there is a good chance there will be bonuses.

This is where I sit currently…

“Control what you can control, and attempt to use what you are given.”

I don’t know where my future will lead, all I know is that I can keep improving myself and making myself better.  One of my favorite sayings that my brother said when attempting to capture a top time on the Strava App.

“Luck is a combination of preperation and oppurtunity coming together”

So after collecting by CompTIA Security+ and CySA+, and completing the LinkedIn Learning course for Python, I continue to work on the preparation piece of luck and I know that whether it is still with Company 2 or with a new company I will make sure that my Luck is not only for me but for my employer also.

So the next Cert that I am focuing on is Cisco CCNA… bring on the Luck I am prepared for it.